Facebook Advertising: Facebook Pixel Implementation and Catalogs
In an era where social media has taken over the world, Facebook is still the most popular network globally. With more than 2 billion monthly active users, the enormous growth of Facebook does not seem to plateau in the near future.
Bearing this fact in mind, digital marketers devised strategies for taping this huge segment of the audience through Facebook Advertising.
Though it is not for the faint of heart who lack sufficient budget and knowledge to cater customers’ needs yet flourishing technology is providing new avenues to advertisers bridging the gaps between them and their audience.
Despite these technological advancements, a few marketers are still in dire need of some intelligent tracking system that is capable enough to monitor their paid campaigns and provide in-depth tracking of conversions.
Facebook Pixel, a targeting and remarketing revolutionary, thus, comes into play!
Considering its immense importance in refining Facebook ads strategy and reaping maximum benefits, in this article I will talk about the Facebook pixel implementation and how they can facilitate eCommerce merchants to create catalogs.
Before we discuss how leading eCommerce platforms like BigCommerce, Shopify, and Magento implement Facebook pixel and catalog, let’s have a close look at what role do Facebook Pixel plays in social media advertising.
What is a Facebook Pixel?
Facebook Pixel is a short code provided by Facebook that is to be placed in the header template of your website or CMS. This code is unique to your Facebook ad account.
The pixel fires to track the website visitors. The data stored inside it, called pixel data, allows marketers to understand how people interact with their website and helps retarget them through Facebook ads in the future.
In a way, Facebook Pixel helps marketers to get more insights into the visitors and allow tracking the effectiveness of their social media promotions.
Features of a new Facebook Pixel
The new Facebook Pixel is a combination of two of its older versions: custom audience pixel and conversion tracking pixel.
Source: https://www.facebook.com/business/help/1686199411616919#
An example of a Facebook Pixel:
Who uses Facebook Pixel?
It is used by the anyone who is either:
- Currently running Facebook Ad Campaigns
- Or, thinking of running Facebook Ads
3 Significant Functions of Facebook Pixel in eCommerce
Here are three primary functions that Facebook pixel plays in digitized Facebook Ads:
- 1. Track conversions/events
It allows marketers to track the performance of ads by realizing what particular actions do website users took in response to your Facebook ads. For example, making a purchase, subscribing to your newsletter, etc.
Did people take the required action you want them to take after you send them to your website?
Pixel allows you to monitor this. The ads manager of Facebook shows a section called ‘conversions’ which shows how many visitors converted, the cost of each conversion as well as the total amount spent.
- 2. Optimize Ads
Facebook Pixel allows merchants to automatically improve the ads for showing to more audience that is likely to convert.
With pixel, Facebook becomes capable to detect the best converting user and therefore serve your ad to people like that within your ad campaign.
- 3. Retargeting
Facebook pixel is a retargeting miracle to digital marketers. It helps you to retarget your visitors based on the specific action that they took on your website. Example, adding a product to the wishlist or shopping cart, etc.
How is retargeting done with Facebook Pixel?
Pixel uses 2 parts for retargeting customers:
- Base code – used across each page of your website
- Standard event code – determine the action you are tracking for an placed on the particular pages of your website
For instance, If you want to track people who added products to their carts but abandoned later, you can make use of standard event code. You need to insert that specific ‘standard event’ in the script of your ‘base code’ as shown below:
Source: https://mrgavinbell.com/facebook-pixel/
This allows you to track everyone that do this activity. You can later retarget those individuals by displaying ads on Facebook which they can see.
Activating your Facebook Pixel
Facebook Pixel is created from a Facebook ads manager account. Remember, only one pixel per ad account can be created. Follow these steps to activate a pixel for your website:
- 1. Open ads manager of your Facebook account by clicking the top right corner. Click manage ads.
- 2. From the hamburger icon at the top left corner, click the events manager and go to the pixels tab.
- 3. Click ‘Create a pixel’ button.
- 4. A unique pixel will be created.
- 5. Choose from one of the three setup methods to place the Facebook pixel to your website.
You can either install pixel code by yourself or send email installing instructions to the developer. But if you want to go with platform integration of Facebook pixel you can choose the first set-up method. Facebook offers pixel integrations for Shopify, BigCommerce, Magento, and many other e-commerce platforms as shown below:
- 6. Click on the e-commerce platform for Facebook pixel integration and follow the instructions given for each platform whether it is Shopify, BigCommerce, Magento, etc.
- 7. After adding a pixel to your website, you can set up events to track actions that matter to your business or you can create catalogs to add products for retargeting.
How to check if Pixel is working fine?
Make sure your Facebook pixel is working correctly. To accomplish this, open Chrome and add extension ‘Pixel Helper’ to your browser.
Once the Pixel Helper detects a pixel on your website and reports no errors, then you’re all set to creating Facebook ads with your pixel.
Using Facebook Pixel to Create eCommerce Catalogs
An ecommerce catalog is a container that holds information of all the items that ecommerce owners wish to advertise across various platforms like Facebook, Messenger, Instagram, and Audience Network.
After it is created, the merchants can use it for different business uses like tagging items on Instagram, etc.
In the case of Facebook ads, you can use your catalog with multiple Facebook ad types and formats like Dynamic Ads and Ads to Drive Traffic.
Facebook Pixel method is used to produce e-commerce catalogs only. There are two things to keep in mind before you create catalogs:
- It is necessary to create ‘standard events’ and ‘tags’ for each product on your website if you want to use a Facebook pixel for a catalog.
Add the ViewContent event as a standard event which enables the pixel to report which particular items from the catalog have been viewed by the visitor. And, add Microdata tags as tags for each product page.
- Add the right microdata tags on your websites so that your pixel can efficiently add products to your catalog
Basic Requirements for creating a Catalogue
- Installing a Facebook pixel on your website and setting up proper events to be tracked.
- Installing necessary microdata tags on your e-commerce website for each product that you wish to add to your catalog
- Make sure that a pixel fire has been sent from your website in the last 7 days. Remember, pixel fires depend on the website traffic that a product page gets.
As soon as the pixel fires on your website for a particular product/item, that product is added to your catalog.
Creating Catalog Using Facebook Pixel
- 1. Open the ads manager of Facebook ad account.
- 2. Go to Assets and click Catalog. Choose the category of your business. For your e-commerce website, choose eCommerce. Click Next.

3. Choose the way you want to add products to your catalog and enter a name for your catalog.
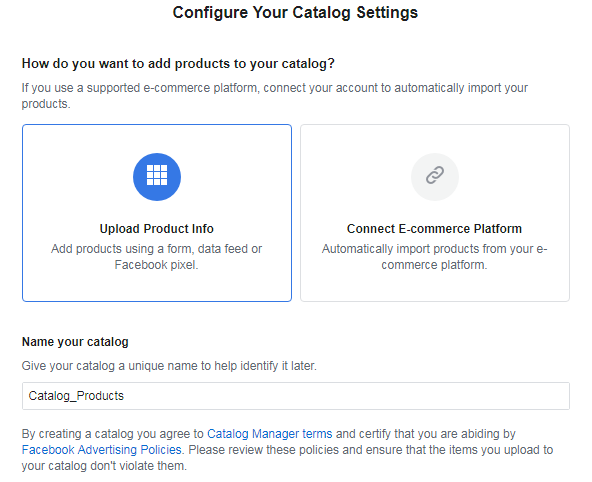 4. Click Create and the catalog is created.
Adding Products to catalogs using Facebook Pixel
Once a catalog is created, you can add products to it. Though there are many methods to add items to your catalog, Facebook Pixel can be used for e-commerce catalogs only.
If you want to automatically update multiple products in your catalog each time a user visits them, you can use the Facebook pixel. Data stored in the pixel will help you add products in the catalog.
- 1. Go to Catalog Manager.
- 2. Choose the catalog from the list that you want to update.
- 3. Go to Products tab and add click add products.
 4. Select Connect Facebook Pixels and press next.
5. Place the pixel ID you want to connect with your catalog and click Next.
Use the pixel that is connected to your ad account to add the product to the catalog. If the pixel is not already added to your website create one.
Note: Before you use pixel for adding each product to your catalog you need to install required metadata tags on your website.
These metadata tags include essential information about the product and are called ‘microdata’. You can choose from the following protocols to add microdata at the correct locations across your e-commerce website:
- Open Graph – Add the microdata in the header section of your website.
- Schema.org – Add the microdata across product page where products are located.
- JSON-LD for Schema.org – Add the microdata inside the script tag.
6. Once your products are uploaded to your catalog, click done.
Connecting with e-commerce platform to import products in Catalog
If you want to import products in your catalog that is hosted on merchant platforms, you need to connect them to Facebook. Merchant platforms like BigCommerce, Magento, Shopify, etc. can be used to create your catalog. Let’s consider these 3 top platforms:
(i) Installing Facebook Pixel in BigCommerce to add products in the catalog
If you’re utilizing BigCommerce for your e-commerce, you can install a Facebook pixel without editing any of your website’s code.
Follow the instructions as shown:
Step 1 – Login to your BigCommerce account.

Step 2 – Select web analytics on your BigCommerce account. Tick the box ‘Facebook Pixel’ and click Save.

Step 3 – Click the Facebook Pixel tab at the top and add the Pixel ID. Click Save.

Step 4 – Verify if your Pixel is working fine by adding your website URL and sending traffic to it.
Step 5 – Once you set-up the Facebook Pixel in your BigCommerce store, you can begin with creating Facebook dynamic ads.
(ii) Installing Facebook Pixel in Magento to add products in the catalog
For your Magento website, you can add products to your catalog by connecting Facebook to your website. Follow these steps:

Step 2 – Login to your Magento Admin Panel, go to settings and follow the instructions as shown in the image below.

Step 3 – Install the downloaded plugin on your Magento website.

Step 4 – In your Magento admin panel, go to the installed Facebook Ads extension section and click Get Started. You can install a Facebook pixel to your Magento store and further add products to your catalog.
Step 5 – After the set-up is complete, the products are imported from the Magento website to your catalog.

(iii) Installing Facebook Pixel in Shopify to add products in the catalog
Integrating your Shopify account with Facebook can help online merchants measure the number of visitors, track conversion events, and how visitors responded to your ads. Utilizing this information you can optimize Facebook advertisements to get increase sales by creating custom audiences. You can achieve this by:
- Setting up Shopify using Pixel
- Upload products after connecting Facebook to Shopify
Follow these steps to integrate Shopify store with Facebook Pixel:
Step 1 – Login to your Shopify store account and got to the online store.
Step 2 – On the left panel go to Preferences and paste Facebook Pixel ID. Click Save and continue to next step.
Step 3 – ‘Connect Facebook’ with your Shopify admin and upload all the information related to each product to your Shopify account. Follow these steps:
- Log in to Shopify.
- On the left panel go to the + symbol next to Sales channels in the Shopify admin and click the Facebook channel.

- Click Connect account.

- Lastly, connect Shopify with your Facebook business page. Once Facebook verifies your Shopify account information, you can upload products to Facebook.
Extensions for Integrating Facebook Pixel with e-commerce platforms
If you find adding scripts to your ecommerce website a hectic approach, you can opt for third-party plugins/extensions that are available in the market.
The advantages of using these extensions are they provide the GUI Interface to connect Facebook pixel to your website without the need of adding any coding.
(i) BigCommerce extensions to integrate Facebook Pixel and Catalogs
This BigCommerce extension is used to integrate Facebook Pixel. It provides the following features:
(a.) Pixel installer: It allows you to perform conversion tracking, Ad optimization, and remarketing.
(b.) Product catalog integration: Importing your catalog to Facebook allows merchants to create dynamic ads. Instead of creating an individual Ad for each product, Facebook creates dynamic ads for your custom audience.
This extension can be downloaded from BigCommerce’s app section. This free app provides the merchant features like easy installation wizard for installing your Facebook Pixel, catalog manager to manage Facebook Catalog and review issues, and analytics tools to report and review campaign performance stats and much more!
(ii) Shopify Apps to integrate Facebook Pixel and Catalogs
- izyPixel
This easy to install third-party Shopify app is used to integrate pixel in your Shopify ecommerce. This intelligent app instructs your Facebook Pixel to optimize your advertisement conversion.
Besides creating Custom Audiences for your Facebook ads, it also manages everything from your ecommerce store.
It is a paid app with a subscription of $9/month and comes with a 3-day free trial. It provides integration with Facebook marketing API and facebook pixel.
2. PixelHook
This amazing app trains your Pixel to optimize Conversion in a super intelligent way.
PixelHook is capable of running multiple Facebook Pixels. This helps to achieve the best scaling result.
The app is available at a subscription of $12.99/month and offers a 7-day free trial.
(iii) Magento Extensions to integrate Facebook Pixel and Catalogs
This free Magento extension by Apptrian adds Facebook Pixel and Dynamic Ads code on CMS pages including Homepage, product pages, category pages, catalog search pages, catalog advanced search pages, checkout success page, and many more.
It helps integrating Facebook Pixel in Magento 2 as well, however, there might be need of adding custom code in a file.
For details check with Magento marketplace.
2. Cadence Fbpixel
Cadence FBPixel is a Magento extension that provides multiple Pixel IDs that can be used for different stores. It supports all the Facebook Pixel standard events. The extension also offers compatible tracking with most Magento themes.
This is a free Magento extension that allows merchants to quickly implement the Facebook Pixel in a website and track standard events. The extension connects the relevant pixel in the header of your store’s webpage.
To use this extension, online merchants require a Facebook Advertising Account.
Cadence also provides a Magento 2 extension for installing pixel on Magento 2 stores exclusively.
What We Have Learned From Our Experience With Pixel?
In one of our recent experiences, we integrated Facebook Pixel and created an eCommerce catalog for a Shopify Store.
The store comprised a variety of categories with quite a long list of products. They often ran paid campaigns on Facebook but tracking the conversions and retargeting their specific audience accurately turned out to be a challenging task. We installed Pixel in the store which allowed us to track our paid advertisement impressions.
Moreover, product catalogs were created utilizing the same unique pixel ID from the Facebook Ads account. Whenever a user viewed a product on the website, pixel checked the presence of product in the catalog. If a product was found missing, it immediately added that specific product in the catalog. Pixel captured the user’s data and thus, the same product was displayed later as a sponsored Ad on that particular user’s FB feed. This ultimately led us to see the desired outcomes.
Wrapping it up
The evolution of Facebook pixel has undoubtedly brought a revolution in Facebook advertising niche, making it easier for digital marketing to track, optimize, and retarget their custom visitors.
Implementing Facebook pixel and catalogs via third-party apps/extensions or direct integration of e-commerce stores with Facebook has helped businesses garner more website views, drive more sales, and understand how to cater to the extensive needs of your core audience.
Hopefully, including this strategy in your advertising efforts, you’ll create more powerful Facebook ads to increase the longevity of your e-commerce store.
In case you want to integrate Facebook Pixel with your eCommerce website, reach us today.